When you’re building a custom fishing rod, every detail matters. The handle, the wraps, the guides—all come together to reflect a builder’s skill. But there’s one element that’s often underestimated, despite its lasting impact: the decal. Fishing rod decals are more than just a sticker. They’re your signature, your brand, your craftsmanship in a square inch or less. And as Chuck and Debbie Brown of Decal Connection can tell you, getting that tiny piece right takes more than just good looks—it takes know-how, experience, and a bit of pro-level finesse.
Since acquiring Decal Connection in 2005, Chuck and Debbie have become an institution in the rod building world. They’ve served everyone from hobbyists to OEM manufacturers, creating decals for brands like Point Blank, Seeker, and American Tackle, as well as countless individual builders. Whether you’re a weekend rod crafter or producing commercial quantities, they’ve seen it all—and helped make it look good.
Why It’s More Than Just a Sticker
For many custom rod builders, the transition from hobbyist to professional starts with the decision to brand. That first logo decal is more than a finishing touch—it marks a shift in mindset. You’re no longer just building for fun; you’re building something worth recognizing.
As podcast host and longtime customer Bill Falconer put it, “Building a rod takes hours—days, even. Why wouldn’t you want to make your mark last?” Chuck and Debbie have made it their mission to help builders do just that. And the difference it makes in perception—both from customers and fellow builders—can’t be overstated. Decals signal intention. They’re not just about aesthetics; they tell the world this is your work.
Common Mistakes First-Time Decal Users Make
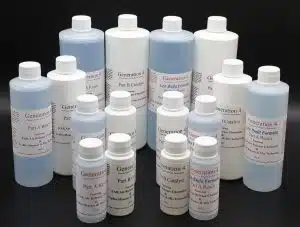
For first-timers, it’s easy to misjudge how much thought and care goes into the proper application of fishing rod decals. The biggest issue Chuck and Debbie see is surface preparation. Too often, builders try to apply decals directly onto an untreated blank. Whether it’s an unsanded surface with micro ridges or just inconsistent blank finishing from the manufacturer, decals need a smooth, sealed surface. The solution is straightforward: apply a layer of finish—whether that’s epoxy, color preserver, or even clear fingernail polish—before applying the decal. It guarantees a uniform base and prevents adhesion issues.
Contamination is another silent saboteur. Silicone-based soaps, garage sprays like WD-40, and airborne contaminants from lawn or pest treatments can all interfere with adhesion or finishing. Even if your shop looks spotless, residual silicone from common hand soaps can be enough to cause issues. Chuck recommends switching to bar soaps like Lava or specialty cleaners like Grip Clean, which scrub without leaving behind problematic residues.

Cutting is another overlooked detail. Using a dull or sticky pair of scissors to trim decals can damage the carrier sheet or introduce adhesive smudges that throw off alignment. Chuck suggests keeping a dedicated pair of ultra-sharp scissors—like barber shears—that are used exclusively for cutting decals.
Then there’s alignment. Rushing placement often leads to crooked or misaligned decals, and the urge to press it down before checking positioning is common. Chuck recommends gently laying the decal onto the blank first without applying pressure. That way, if it’s off-center, it can still be repositioned. Once pressed, however, the decal is committed.
Chuck and Debbie’s Application Secrets
Peel-and-stick fishing rod decals have come a long way in the last two decades. In fact, the switch from water slide decals to dry transfer peel-and-stick was a turning point for Decal Connection. Back in 2008, changes in chemical regulations made traditional waterslide adhesives unreliable. Decal Connection made the full transition to peel-and-stick, and with that came a learning curve—but also major benefits. These newer decals go on cleaner, don’t wrinkle, and skip the 24-hour drying delay that waterslide decals required.
The best results come from treating decal application as part of your finishing process, not just a side step. One essential tip is to avoid pulling the top carrier sheet straight up from the blank. Instead, roll it back on itself at a 180-degree angle. This avoids lifting the decal and helps secure the edges cleanly.

Heating the decal slightly before pressing it down can also make a big difference. A short, gentle burst with a heat gun softens the adhesive just enough to help it bond more effectively. Then, instead of using a burnishing tool—which can mar the surface—use a print roller or brayer to apply even pressure and eliminate air pockets.
Another critical point is how modern epoxies interact with decals. Some newer finishes are more finicky about surface tension and can “fish eye” over decals if there’s no intermediary seal. Chuck’s go-to recommendation is a light coat of clear acrylic spray—like the kind you’ll find from Krylon. A quick pass over the decal sets it and ensures any epoxy will lay down smoothly over top, regardless of brand.
Designing for Rod Scale: Not All Logos Work Small
What works on a website or T-shirt doesn’t always translate to a rod blank. Logos that look sharp on a business card often become unreadable or cluttered when shrunk to half an inch. Chuck and Debbie call this “visual fatigue”—when too much detail overwhelms the eye in a small space.
Their solution is to simplify. Debbie and her team specialize in adapting complex logos for rod-sized applications. That might mean isolating a key symbol, removing text, or converting the file into a cleaner vector outline. The goal is clarity: a logo that can be read and recognized at a glance without squinting.

Ideally, you’ll start with a high-resolution vector file, such as an AI, EPS, or SVG. PNGs and JPGs can also work, depending on quality, and if your logo isn’t in the right format, the team at Decal Connection can usually convert it for you. Many builders send in what they have, and Chuck and Debbie help them refine it from there.
Special Projects and Branding Tips
Not every decal is for a brand. Builders often create rods for retirements, birthdays, charity auctions, or local organizations. Decal Connection has printed logos for Ducks Unlimited, Trout Unlimited, and even personal projects like bank logos for retirement gifts. These one-off or low-quantity projects are a great way to showcase your work and introduce it to a new audience.
However, there’s a catch. Trademarked and copyrighted images—college teams, sports leagues, company logos—can’t legally be printed without permission. Chuck and Debbie are strict about this, not just to protect themselves, but to protect their clients. If you want to use a logo like the Georgia Bulldogs or Disney characters, you’ll need written permission and a compatible file from the trademark holder.
The good news is that many universities and organizations are happy to cooperate for special projects—especially if the recipient is an alum or donor. Some even send a formal license or limited-use agreement for the print run. As long as you follow the process, it’s possible to create something truly personal and one-of-a-kind with your custom fishing rod decals.
When Not to DIY Your Own Decals
It’s tempting to try printing fishing rod decals at home—especially for builders who already take a DIY approach to rods. But there are real limitations. Chuck is the first to say he’s helped plenty of builders try—and many come back when they realize what’s involved.
Home printers like the Alps or entry-level Epsons can produce basic decals, but they struggle with color accuracy, layering, and consistency. Metallics, white ink, and opacity are particularly difficult to reproduce. The time investment in trial and error, maintenance, and supplies quickly adds up—and you still won’t match the quality of a professional setup.

Even high-volume builders often choose to outsource their decals, simply because the cost, time, and hassle of doing it themselves isn’t worth it. Chuck and Debbie have helped plenty of builders troubleshoot their setups—and in many cases, those same folks eventually become customers once they hit a limit.
Why Decals Matter for Rod Builders at Every Level
No matter where you are in your rod building journey, your decals represent your work. They’re the final step in every build and the first thing someone sees when they pick up your rod. Getting them right—both in design and application—can elevate your entire presentation.
Chuck and Debbie Brown have built Decal Connection into more than just a business. They’re trusted advisors, problem solvers, and supporters of the rod building community. Whether you’re placing your first order or printing thousands, they’ll walk you through the process with honesty and care.
For more information, visit decalconnection.com. You’ll find FAQs, application instructions, a gallery for inspiration, and an easy-to-use ordering system. You can also email Chuck and Debbie directly at orders@decalconnection.com if you have questions or need a custom quote.
A rod builder’s time is valuable. Let your decal work as hard as you do.